Guidelines for Using Vinyl Tubing in Draught Beer Systems
There are three locations on a tap system where it may be necessary to use vinyl tubing:
- Inside of direct-draw “beer boxes” where runs are six feet or less
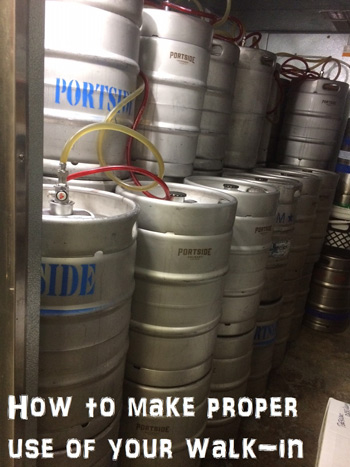
- Inside of walk-in coolers as “jumper” line connecting the keg coupler to the trunk line
- Immediately before the beer shank and faucet as “choker” line to complete the required restriction rating for the system
Because vinyl is not considered a food grade material, the use of vinyl beer and gas lines should be kept to a minimum when designing and installing any tap system.
Vinyl tubing entered the draught beer industry as an alternative to copper and tin coils for short run direct-draw draught beer systems. The advantage is that vinyl is very flexible, unlike copper and tin, and it provides a restriction value similar to that of a copper or tin coil, therefore making it an ideal alternative to conventional coil systems.
Today, tap systems come in a variety of shapes and sizes, and the use of vinyl material has been implemented for both the added flexibility and as a convenient method of adding restriction to a system when necessary; but it must be noted that vinyl, as compared to copper, tin, and polyethylene materials, collects far more debris due to its porous, absorbent nature, and in order to maintain optimal sanitation within a tap system, the use of vinyl must be kept to an absolute minimum.
Guidelines for Using Vinyl Tubing in Draught Beer Systems
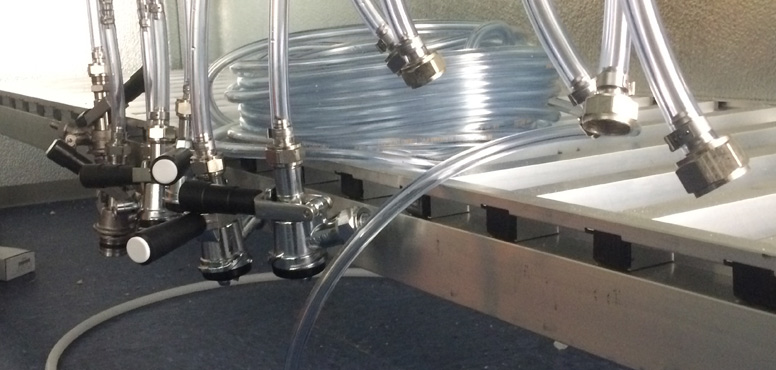
Always use clear vinyl tubing so that contamination can be seen.
Direct-draw Systems
Direct-draw systems utilize 3/16” inner diameter (id) tubing for all beer line. The length of vinyl tubing used per line must match the desired restriction rating for the system. A standard American system dispenses beer at a carbonation rating of 2.5 – 2.7 volumes CO2 at a rate of 2 ounces per second (8 seconds per pint).
These dispense specifications are achieved only if the applied gas pressure, keg pressure, and total restriction rating of the system are each equal to 10 psi and the beer is dispensed at 35° F. Therefore, the appropriate length of each vinyl beer line may be determined by obtaining the restriction rating from the manufacturer, then dividing 10 psi by that rating. Most 3/16” id vinyl tubing has restriction ratings of 1 to 3 lbs/ft.
Example: If the rating is 2, divide 10 psi by 2 lbs/ft and the line length required to achieve 10 lbs total restriction is 5 ft.
Vinyl gas line should also be kept to a minimum. Most couplers are fitted with a 5/16” id gas inlet, so 5/16” is the practical size for gas line. One main gas line should run from the gas source to a manifold or T, and the manifold should be placed at a location that minimizes the length of gas line required to reach each coupler.
It’s necessary to keep the use of vinyl gas line to a minimum because vinyl, unlike metal and polyethylene, is gas permeable. This means that trace amounts of CO2 and N2 naturally escape through the vinyl material itself, thus incurring continuous gas loss. In order to minimize operating costs, vinyl gas line should be used sparingly.
Long-draw Systems
Long-draw systems are composed primarily of polyethylene beer line, but vinyl may be used as “choker” and “jumper” line at the front and rear of the system. Inside of a walk-in cooler, vinyl beer line may be used to connect each polyethylene line of the main beer line bundle to their respective keg couplers. For this application, 5/16″ or 3/8” id vinyl beer line is preferred. Vinyl will add a significant amount of restriction to the system; therefore, larger diameters are used in order to minimize restriction at the rear of the system.
Restriction must increase from rear to front, so that the flow of beer decelerates as it moves through the system and pressure is maintained. Remember, pressure is defined as resistance to flow. If restriction ratings decrease from rear to front, beer flow will accelerate, resulting in agitation, and pressure will be lost causing gas to separate from liquid, and subsequent foam at the faucet.
When installing vinyl jumper lines inside of a walk-in, there are three factors to consider:
- The height of the tap system
- The distance to the floor of the walk-in
- The restriction imparted by the addition of each piece of vinyl
Ideally, the highest point of elevation on a tap system will be the faucets. Beer in a tap system is pressure-driven, and the pressure originates at a gas source. Since gas is naturally lighter than liquid (at least in terms of CO2/N2 versus liquid beer), the gas in the system is constantly trying to rise—drawing beer with it. If at any location in a tap system the beer line peaks above the elevation of the faucets, gas will have a natural tendency to accumulate there, creating a gas pocket. When gas accumulations release, the result is “burping” or “bubbles” at the faucet.
Given an ideal setting upon installation, a tap system will be installed with the faucets being the highest point. So, when connecting vinyl jumper lines to trunk line, keep all jumper lines below the level of the faucets, as to prevent accumulation of gas within the jumper lines.
Once the upper end of each vinyl jumper line has been connected, the maximum allowable length of each line may be calculated by measuring the distance from the trunk/jumper connection to the floor, then subtracting six inches. This will provide space for the coupler to be connected without touching the floor when the jumper line is hung freely. Preventing the coupler from touching the floor is a sanitary measure that will avert microbial contamination of beer inside the keg.
Once the maximum jumper line length is determined, calculate the restriction that will be imparted based on length and inner diameter. Take this number into account, as it will be a critical figure in the overall restriction of the tap system. The restriction imparted by vinyl jumpers can be adjusted by altering the length and inner diameter of the vinyl line used.
 Also, keep in mind that if jumpers are not all the same length, then restriction will vary line to line and equality must be re-established somewhere else in the system. Therefore, it is best to keep jumper line lengths consistent throughout the system regardless of the potential added convenience of lengthening jumper lines to reach kegs. JUMPER LINES ARE NOT EXTENSION LINES. Move the keg to the line. Do not extend the line to the keg. And keep all vinyl jumper line lengths to a minimum to ensure optimal system sanitation and to minimize gas loss.
Installing vinyl choker line is not always necessary, and most tap systems can be designed to avoid the use of choker. But if beer is pouring too fast or increased carbonation is desired, the addition of vinyl choker line is a simple and easy modification that will remedy flow rate and carbonation issues when all other factors are within specification.
By using 3/16” id vinyl tubing that has a restriction rating of 3 lbs/ft, the total restriction of a tap system can be increased without significantly increasing total line length. Choker line is placed directly behind the faucet and shank to slow pour rate and increase the volume of CO2 the system will retain.
Cleveland Beer Line Cleaning, LLC takes great pride in the customization of each tap system we install. Proper use of vinyl beer and gas line is a critical determinant in the resulting performance, sanitation, and efficiency of a draught beer system. By understanding the demands of each establishment, we are able to correctly design a system that suits our customers’ needs, and will dispense quality draught beer for years to come.
Want us to take a look at your tap system installation? Or do you need a tap system installed?
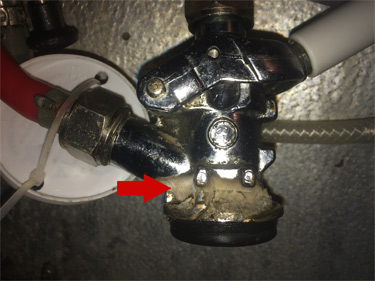 The most common points of microbial infection on a tap system are the faucets and keg couplers. These two locations are constantly exposed to open air where airborne bacteria, mold, and yeast will continually take advantage of beer as a nutrient source, forming films on sugar and protein residues that develop on these components.
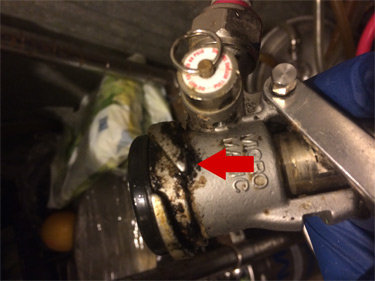 water. Most of the film will fall off and the remainder may be scrubbed off using a small brush (toothbrush works well). To prevent future films from growing, couplers may be sprayed regularly with a simple antiseptic solution such as 50/50 rubbing alcohol (isopropanol)/water or 50/50 ammonia/water. These chemicals are strong antimicrobial agents that are safe to use as a no-rinse sanitizer on tap system components and will leave no flavor or aroma in the beer.
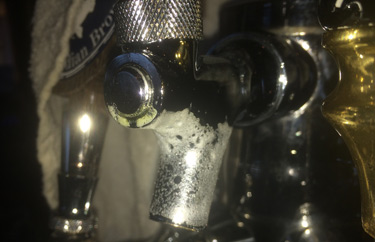 open invitation for microbial contamination. Airborne bacteria, mold, and yeast will quickly bind to these residues, metabolize them, and produce off-flavors and aromas at the faucet.
 If exterior tap system components have experienced spoilage issues, then it’s likely the interior of the system contains spoilage microorganisms as well. Mold on keg couplers quickly makes its way into beer and gas lines. If your system was properly designed with clear vinyl jumper lines, then you will be able to see microbial deposits if infection is present. These deposits will appear as dark discolorations, solid films, and/or spots of microbial colonies.
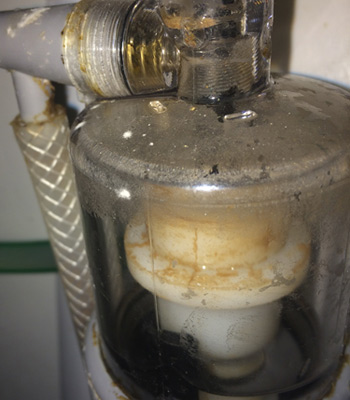 doing so, permanent sources of spoilage are completely removed from the system, providing a clean slate for fresh draught beer service.